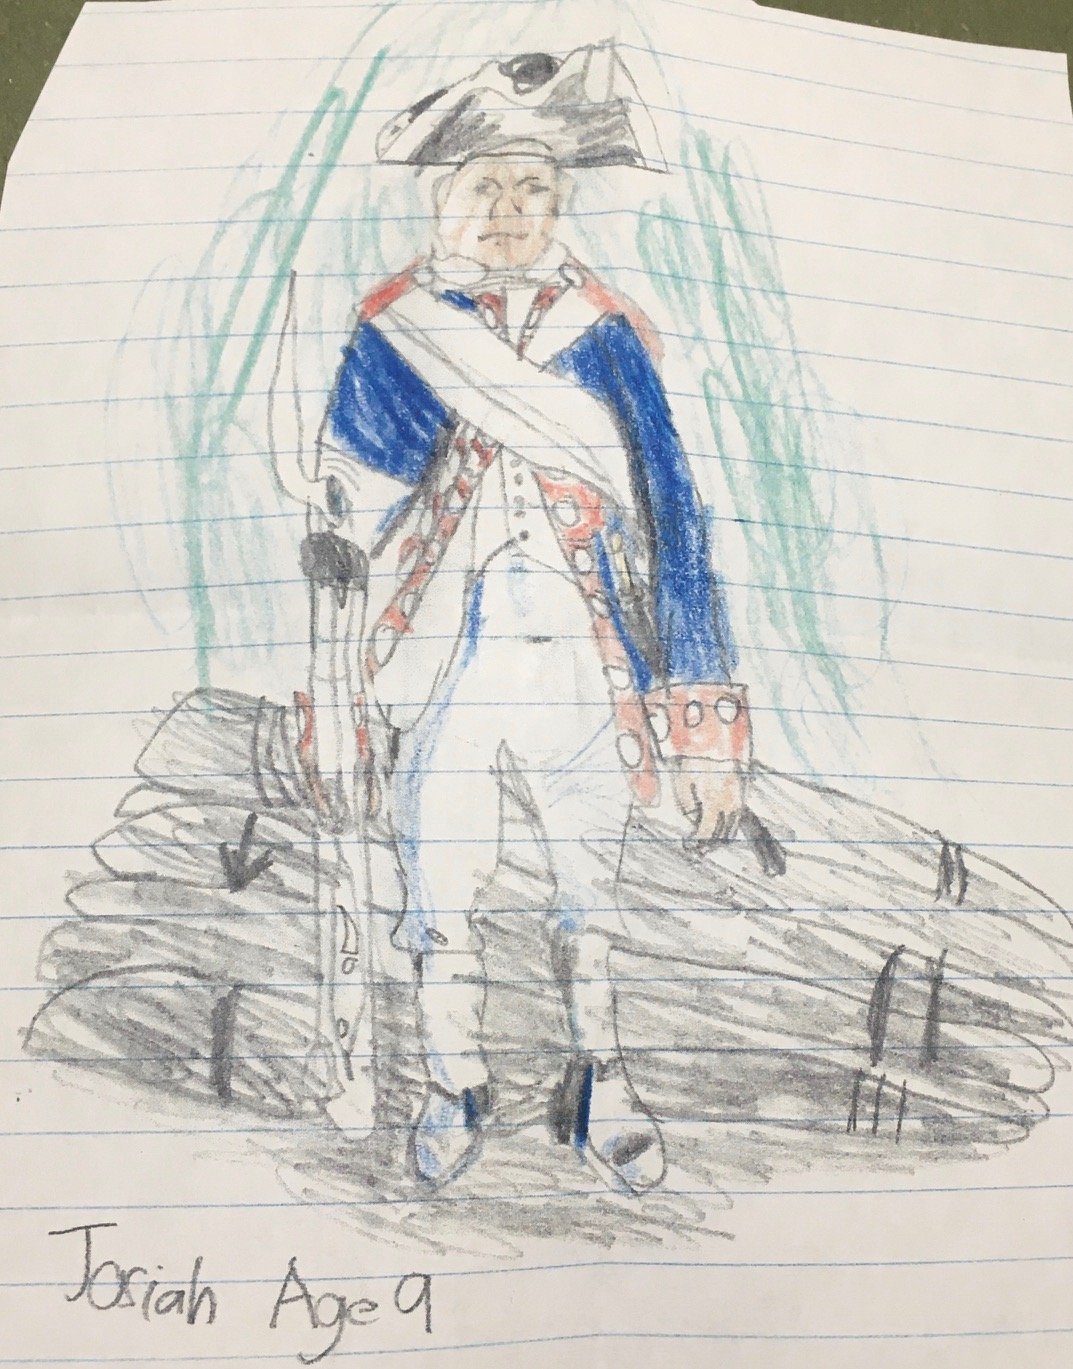
Contact


Email

Phone:
360-779-8089

FAX:
360-779-7531

Mail:
Draw Your World
PO Box 818
Keyport, WA 98345 USA

Thursday
Jul282011

Curious Drawings

We began working on Draw Write Now in 1992 when my children were four and six years-old. They were immersed in their grandmother’s drawing lessons, and I have to admit that I wondered if all the exposure to the lessons would limit their budding creativity. I got my answer with these two drawings:
Draw Write Now, Drawing Lessons, CuriousTyler, age 6, “Curious wants to be held by Mom.”I had the flu, and Tyler and I were the only ones home. Sick and not able to watch over him as usual, I heard him go outside and told myself he would return shortly. Just as I was getting worried, I heard him come inside and quietly amuse himself in the front room. A while later he came to my bedroom with this drawing and note. We had chickens, and his favorite rooster’s name was Curious. He had gone out to the pen to get a look at Curious so he could draw the picture.

Draw Write Now, Drawing Lessons, CuriousMichelle, age 8, “Curious”

Draw Write Now, Drawing Lessons, CuriousTyler holding Curious.Michelle loved Curious, too, and made this drawing by looking at the photo of Ty and Curious.

After making many, many Draw Write Now drawings of dogs, cows, boys, girls, horses and yes, chickens, they had the skills to look at a subject and draw what they saw. I’d say that’s an important skill for a creative child to possess!

Thursday
Jul142011

Look at Handwriting: Writing Size

Beautiful handwriting by Melissa, age 7:

Handwriting Practice Papers
CLICK TO ENLARGE. Draw Write Now, Book 8: Horse Lesson, p.32

Melissa obviously has good guidance. To continue developing her skill, I recommend two simple changes:

Change the Guideline Paper
Melissa’s paper has 5/8 inch guidelines. I’d like to see her use the next size down—paper with 1/2 inch guidelines. At the bottom of the paper, she wrote her name and age using consistent letter sizes—she knows how to use guidelines—but, many of the letters in her first four sentences drop below the mid-line or float above the base-line. I think that handwriting practice has become a bit tedious for Melissa. She has developed good control and is able to write smaller. A practice paper with smaller guidelines would match her current skills, and her practice-time would once again be … (dare I say?) … fun!

Change the Letter d
I’d like to see Melissa change the way she makes the letter d. She is starting the letter from the top line. I would advise her to make it like her letter a. Read more on letter formation…

Letter dStarting at the mid-line, make the letter c shape, swing up to the top line, then down to the base line. (Like the letter a, with a taller straight line.)

Regularly look over handwriting practice sheets. Handwriting practice is about memorization and developing habits—we want letter formation to become rote and words to flow on the paper. Catch the errors before they become habits! Keep practice time fun!

Wednesday
Jul132011

Posture While Drawing or Writing

Handwriting instruction:
  1. demonstrates how letters are formed
  2. promotes a good pencil grasp and good posture
  3. encourages regular practice 
Posture
while Drawing or Writing

Generally, we think of sitting at a desk or table while drawing or writing, but we can also stand at an easel or blackboard, and there are those relaxing times when, with pencil and paper in hand, we lounge or cuddle.Standing While Drawing & WritingWriting or drawing while standing at a vertical surface—an easel, white board, or any vertical surface in a house (wall, fridge, glass door)—has these benefits:
  • the hand and forearm fall naturally in the correct position
  • arm movement is free—The heel of the hand is not “planted” in one position. When the hand is “planted”, movement is restricted to only the fingers.
  • downward strokes come naturally, which is similar to the top to bottom direction used when writing letters
Take the toddler out of the highchair so they can stand while they color and scribble. Let the four year-old draw a dog on the garage wall. Give the 7 year-old an easel. Challenge the 12 year-old to draw while standing.  Sitting While Drawing & WritingMost of our drawing and writing is done while sitting at a table. The arm rests on the surface of the table, stabilizing the hand and arm movement.
When sitting:
  • feet are flat on the floor (or a step stool or a stack of books)
  • knees are at the same level as the hips
  • arms, bent at the elbow, rest on the table top
  • shoulders are relaxed, not scrunched up toward the ears
Maintain the hand/wrist/arm position that is presented while standing. Watch for “planting” of the hand—the hand and forearm should rest on the table top and provide stabilization for the arm, but not constrict movement. The non-writing hand stabilizes the paper. Relaxing While Drawing & Writing Just as we like to see a child relaxing with a book, we love to see a child lounging with a pencil and paper. A relaxed posture while writing/drawing has it’s place and time, simply remember to include plenty of practice time in the standing and/or sitting positions. 

“Sit up straight.” — Marie Hablitzel

Climb a Tree to Improve HandwritingPlay Packs for Gross Motor SkillsPlaytime activities—swinging from bars on a jungle gym, climbing a rock wall or walking like a crab—develop the skills needed for good posture. See Play Packs: indoor play activities for strengthening gross motor skills.

The Desk and ChairLook for the following:
CHAIR: Use a child-size chair, or use an adult chair with books or a stool to support the feet. See a chair that adjusts as the child grows, and can be used at a standard-height table.
TABLE: Use a child-size table. See the adjustable table we’ve used for many years—we love it!
Balance and Posturebalance cushion is a simple therapy tool that engages the muscles used to “sit up straight”. An EaselAn easel has a slanted surface, which is more comfortable to work at than a straight up-and-down surface. 
  • Make a simple easel—lean a board against a wall. This could be an old bulletin board or whiteboard. Of course, stabilize the board at the top where it touches the wall and block the bottom.
  • Buy an easel designed for children, or build an easel.
Tummy-TimeInfants as well as 12 year-olds benefit from “tummy-time”. Therapist recommend that children lay on their stomach while propping their upper body with their arms. This position may be awkward for writing, but is fine while watching TV, reading or playing with small toys.
Wednesday
Jul132011

Swan Lesson, Draw-Write-Now

Draw Your World Swan Drawing Lesson for Children


Write about your drawing.

Color your drawing.

Color the drawing with crayon.

Get more practice!
The more you practice, the better your writing and drawing will look. Find plenty of practice material in the eight-book Draw Write Now series. Each lesson is presented on two pages; one page has a drawing andDraw Write Now Books for ChildrenSwan lesson—Draw Write Now, Book 1 four short sentences, and the other has the step-by-step instructions.

Drawing develops an understanding of scale and proportion.

A child may use the Draw Write Now books independently, or the lessons can be augmented following this basic format:
  1. Introduce the subject
  2. Draw the subject
  3. Create the background
  4. Write about the drawing
  5. Color the drawing

Drawing What You SeeWhen we draw something, like a swan, the first thing we do is look at the object to be drawn. Sometimes we can do this using our memory—we’ve seen a swan and we remember how it looks. Other times, we go to the park and actually look at a swan.

The ProblemWhen relying on memory, we can forget the length of the swan’s neck. (Too short? It could look like a duck! Too long… that could look odd!) Or, when we see the swan, it moves around too much for us to study it’s shapes and lines. In our lessons, we look at a simplified drawing of a swan, and use reference points and comparisons to get the swan to look like the thing we see. Also, we learn to plan ahead so there will be room on the drawing paper for the tail feathers.

The SolutionDrawing helps us notice and appreciate the scale and proportions of objects. The following tips will serve as an example. Remember to look at the color drawing and use the step-by-step drawing as a reference.

Tip 1—Pay close attention to where you place the first line (Step 1). It is the swan’s head, neck and a bit of the upper back. Draw this line closer to the left side of the paper, about half-way up on the paper.

Tip 2—Compare the size of the body to the size of the head (Step 2). The body is much larger than the head. If you divide the paper’s width into thirds, the body oval is about the size of the center third. How close is the bottom of the oval to the bottom of the paper?

Tip 3—We tend to assume that the eyes are located at the front of the head, but look carefully. The eye (Step 3) is drawn at the center of the head oval.

Tip 4—How long are the tail feathers? Compared to the neck, they come up to about half the length of the neck.

Tip 5—The front of the wing comes up to the height of the base of the head.

Compare lines or shapes while drawing. Use the edges of the paper as a reference point. With an understanding of scale and proportion, we can draw just about anything!

Tuesday
Jul122011

Hold the Pencil

Handwriting instruction:
  1. demonstrates how letters are formed
  2. promotes a good pencil grasp and good posture
  3. encourages regular practice 
Hold the Pencil

The time-tested ergonomic way to hold a pencil is the tripod grasp. Most children can learn how to place their fingers in the tripod position, but if they have established another grasp, the tripod may feel awkward at first. Changing any habit is difficult, particularly when it involves muscles and coordination. Some children can change to the new grip within a few days, while others need a month or so. Adults tend to take even longer before they can consistently use the new grip.

Finger positionThree fingers—the long finger, the thumb and the index finger—form a tripod to hold the pencil, as shown in the illustration. Index Finger RestsMany people put extra pressure on the index finger, hyperextending the first joint. (Check for pressure in the knuckle.) The tip of the index finger should rest on top of the pencil. Fingers Bend, SlightlyAll five fingers should bend slightly. (Some people pull their fingers into a fist. Some hold a pencil with their thumb straight.) A ball should be able to fit inside the hand. Training ToolsIt The Writing CLAW for pencils, ergonomicThe Writing CLAWcan be challenging to keep the fingers in the tripod position, but there are a variety of tools available to help keep the fingers in place. They are temporary tools, much like training wheels on a bicycle. See them in our store.Pencil GripsThe Pencil Grip Position of the HandThe underside of the forearm and the thumb should line up. Some people hook the hand toward the body, pushing the elbow away from the body.) Spend some time practicing on vertical surfaces, such as an easel or paper taped to a wall, since it is natural while working vertically to hold the hand up and drop the elbow down. Position of the PencilThe pencil eraser should point toward the should, however the pencil position is not critical if the hand position is good. This rule is most helpful for left-handers, since it allows a better view of the freshly written words and the hand does not smudge the words. How does the Hand Feel?Understand the amount of tension needed to grasp the pencil:
  1. Have the child pretend to hold a small stone tightly in their tripod fingers as you count together to ten. Release the pretend stone and discuss how your hands felt while holding the stones.
  2. Have the child pretend to hold a cooked pea gently in their tripod fingers and count to ten. After releasing the pretend pea, describe how your hands felt while holding the pea, How can a relaxed hand make writing easier?
A Softer PencilDark, heavy writing or drawing indicates that the person is bearing down on their pencil. They simply want to see their lines. Over time, this extra tension in the hand becomes a habit. Switch to a soft-lead pencil (sketching pencil, 6B). Compared to a No. 2 pencil, a soft-lead pencil requires much less pressure to produce a dark line. Soft-lead pencils are available in our store. Soft Lead PencilSoft-Lead Pencil


Play Packs - Fine Motor SkillsTension or bearing down may improve as the child’s fine motor skills develop. Encourage playtime activities that use the pinching or grabbing motions—think of stringing beads, rolling clay, making a tower of toothpicks. More ideas and activities are available in PlayPacks.

“It was hard to hold my pencil like this at first, but I kept trying. Now I do it all the time.”— Sarah, first-grade student

Practice Regularly

Motivate children to want to practice. Draw, write, play tic-tac-toe—choose an activity the child enjoys so they look forward to practicing with you. Practice regularly (daily is best). Five minutes is fine for a five-year-old child, and ten to fifteen minutes is plenty for a child who is nine. Adults can practice whenever there is a spare moment.

Not sure how to get started? See the Starter Set.
Keep it up!A child may revert back to their old grasp when you are not there to watch. That’s fine. Continue to practice with them and allow time for the new habits to become established. If several months pass and the child has not changed to the new grasp, consider getting help from an occupational therapist.

Hold the Pencil FlierOver the years, we have sent out a flier with each of our store orders: Hold the Pencil. The flier provides the same information as shown on this webpage, but appears less “wordy” due to the formatting. The flier is now available in packages of 25. Give to parents of new students or members of your group. See it in our store.

Hold the Pencil in the Tripod Grip or GraspHold the Pencil Flier

“It was really easy. My daughter changed her grip within two weeks.”— Carol, mother of a five year-old
Pencil Gripper for Training“At first, my son said that the pencil with the pencil gripper was uncomfortable, so I explained that it was uncomfortable because he was familiar with the other way of holding a pencil. I explained that as he got accustomed to the new grip it would feel better. The only time that I had him use the pencil with the gripper was while we made drawings together. After about six weeks, during a time when he was drawing on his own, I noticed that he held his pencil (no gripper) using the tripod grip. I said, “Look how you are holding your pencil.” He looked down at his hand and said, “I didn’t mean to do it!” We practiced together with the pencil that had a gripper on it a few more weeks, until he told me, “Mom, I don’t need this any more. I hold my pencil like this all the time.”
—Kim Stitzer
Monday
Jul112011

Whale Lesson, Draw-Write-Now


Write about your drawing.

Color your drawing.

Color the drawing with crayon.

Get more practice!

The more you practice, the better your writing and drawing will look. Find plenty of practice material in the eight-book Draw Write Now series. Each lesson is presented on two pages; one page has a drawing and four short sentences, and the other has the step-by-step instructions.Draw Write Now Whale lessonBlue Whale lesson—Draw Write Now, Book 4


Look at an object and visually break it into smaller, more manageable shapes and lines.

A child may use the Draw Write Now books independently, or the lessons can be augmented following this basic format:
  1. Introduce the subject
  2. Draw the subject
  3. Create the background
  4. Write about the drawing
  5. Color the drawing

Complex Made SimpleFind the major shapes and lines that form the whale’s body. Then, focus on the details: the eye, fin and tail.

The ProblemIt can be hard to know which line or shape to focus on first. Some lines are recognizable, like the line making up the whale’s belly—it looks like a big smile—but, the line that makes up the top of the whale’s body is more difficult—it gently curves up and down. A gently curved line can be more difficult than it appears.

The SolutionWith drawing, we learn to study lines and shapes before recreating them. The following tips will serve as an example. Remember to look at the color drawing and use the step-by-step drawing as a reference.

Tip 1—Take a little time to study the whale’s back (Step 2). Before drawing it, run your finger over the line from tail to mouth. It might help to make the shape in the air—with your finger in front of your face, move left to right. The finger gently moves up and down. 

Tip 2—Look at the long line that runs the length of the body. Start near the tail end and focus on curving the line toward the bottom of the eye, make the little dip at the eye, then continue along with the mouth line.

Study the lines and shapes in a subject to break the image down into smaller, more manageable pieces. With that skill, we can draw just about anything!


Sunday
Jul102011

Handwriting Styles

Manuscript, Cursive Handwriting example
Print and Cursive Handwriting example Handwriting instruction:
  1. demonstrates how letters are formed
  2. promotes a good pencil grasp and good posture
  3. encourages regular practice 
Handwriting Styles
How Letters are Formed
“Handwriting is an Art!”, Marie said. The art of forming and spacing letters and numbers has developed over time, and currently focuses on providing children with efficient, graceful methods to write letters and numbers. A handwriting chart or some other reference on how letters are formed (letter cards, alphabet strips, iPad app) is a good reference tool to have available when learning how to write. The following list includes online sources of handwriting charts of the most popular styles used in the US. Styles change over time and new ones emerge. Generally, a manuscript version is taught before advancing to the matching cursive.
Manuscript & Cursive—Zaner-Bloser Zaner-Bloser SimplifiedZaner-Bloser was the standard for many years in the US. After D’Nealian came out, a “continuous stroke”  or “simplified” Zaner-Bloser was introduced. The continuous stroke applies to the manuscript letters—the pencil is not lifted to form a letter, as with the old “ball and stick” method.
manuscript - uppercase & lowercase

Zaner-Bloser - OriginalThe following show the original “ball and stick” style (animated).
manuscript - uppercase
manuscript - lowercase
cursive - uppercase
cursive - lowercase
Spanish

Modern Manuscript & Cursive—D’Nealian D’NealianD’Nealian starts with slanted manuscript letters and transitions easily to cursive writing. It has gained popularity in many school districts in the United States. Products similar to D’Nealian are sold as “Modern Manuscript” and “Modern Cursive”.
D’Nealian - manuscript and cursive chart
D’Nealian - manuscript only

Print, Slant Print, Cursive—Peterson HandwritingPeterson includes a transition between print and cursive, Slant Print. The cursive letters end without a curve, much like the Italic styles. This program includes a depth of information, prompts and help.  
Print
Slant Print
Printing & Cursive—Handwriting Without Tears Handwriting Without TearsHandwriting Without Tears was developed by an occupational therapist. This popular style is simplified, without a slant. The Handwriting Without Tears program includes many tactile products for writing readiness.
Printing - Handwriting Without Tears
Cursive - Handwriting Without Tears

Italic & Italic LinkItalic is so lovely and appealing! Italic There are several variations: Portland Italic, Barchowsky, New South Wales, Victorian, Queensland.

Italic charts (click “Chart” in the left-hand column)
Barchowsky Fluent

“Without instruction or an example to follow, bright children can come up with some terribly awkward and cumbersome ways of making letters!” — Kim Stitzer

Which Style to Use? A handwriting style is a carefully designed, efficient way of forming letters and numbers, and each style has it’s own character or fits certain needs.
SEE EXAMPLES OF HANDWRITING STYLES
Which handwriting style should your child use?
Ask Your Local School—Schools generally agree on one handwriting style to teach. If your child is eager to write and not yet attending school, contact your local school office or a kindergarten teacher and ask which handwriting style is taught.
Homeschoolers—You get to decide! Show your children the various styles and see which appeals to them.
Keeping it SimpleIf you or the school don’t place a high priority on handwriting, at least introduce a simplified style, like Modern Manuscript (D’Nealian), Simplified Manuscript, Peterson Slant Print, or an Italic style. When given no instruction or example to follow, bright children can come up with some terribly awkward and cumbersome ways of making letters!
Left-Hand ModificationWhatever style a left-handed writer uses, there is a slight modification they can make for smoother writing—Pull the pencil toward the hand when making horizontal lines. (For example, a right-handed writer crosses the letter “t” from left to right. For the left-handed, the letter is crossed from right to left.) The following letters are affected:
Lowercase letters: t, f
Capital letters: A, E, F, H, I, J, T.
Begin with Cursive? Sure! Some programs teach cursive first. When Marie started school in the 1920’s, she learned to write using cursive. Manuscript was used for labeling maps or posters. Today, the A Beka program, used in many Christian private schools, introduces cursive first. See examples of A Beka writing. The Peterson Handwriting System has a “Starting With Cursive” program.
See StartWriteCustomize your handwriting practice sheets with the handwriting style of your choice with StartWrite Handwriting Software. Parents, this computer software is a tool that can be used as your child grows. Teachers, the software gives you a tool to work with the varying abilities within a classroom.
Examples of StylesUse a style that fits your needs and desires! Scroll through examples, like this:
Saturday
Jul092011

Tiger Lesson, Draw-Write-Now


Draw Write Now, Tiger Drawing Lesson for Children


Write about your drawing.

Color your drawing.

Color the drawing with crayon.

Get more practice!

The more you practice, the better your writing and drawing will look. Find plenty of practice material in the eight-book Draw Write Now series. Each lesson is presented on two pages; one page has a drawing andTiger lesson—Draw Write Now, Book 7 four short sentences, and the other has the step-by-step instructions.


Drawing instruction improves listening skills and vocabulary.

A child may use the Draw Write Now books independently, or the lessons can be augmented following this basic format:
  1. Introduce the subject
  2. Draw the subject
  3. Create the background
  4. Write about the drawing
  5. Color the drawing

Vocabulary and ListeningDrawing instruction enriches our children’s lives. When we draw a shape, such as an oval, while saying “oval”, a child learns a new word—and we may not even be aware that we are expanding their vocabulary! In addition, a child is motivated to listen carefully as you describe the next step toward drawing something interesting—like a tiger!

The ProblemWe may feel inadequate about our own drawing skills, or may have time or schedule restraints making it hard to include drawing instruction.

The SolutionYou don’t need to be an artist to give drawing instruction. Whatever your strengths, while giving the lessons you will pass along your experience and knowledge. The following tips will serve as an example. Remember to look at the color drawing and use the step-by-step drawing as a reference.

Tip 1—Expand a child’s vocabulary as you describe what you see. A child may not know the meaning of these words: CIRCLE, TRIANGLE and RECTANGLE (Step 1). Simply use these words in your regular conversation: DIAGONAL (stripes in Steps 3 and 4). As you describe and point out lines and shapes, the child will assimilate them: CURVED (tail in Step 5). Other words will come naturally as you draw along with the child: TALL grass, YELLOW sky.

Tip 2—Drawing demonstrates concepts like OVER, UNDER, LEFT, RIGHT, TOP, BOTTOM, CORNER, CENTER, HALF— it’s simply part of the conversation you have while drawing!

Tip 3—Do you notice the concentration level building? Focusing on your words and examples helps a child learn to listen and follow instructions.

Drawing instruction benefits children in subtle ways. We may think we are incapable of teaching a child to draw, but really, we can draw just about anything!